Crockpot Chicken Tacos

Slow Cooker Chicken Tacos

Another day, another crockpot recipe! Seriously, this is the EASIEST “recipe” ever, and it is so, so good! It’s no secret we’re big fans of Mexican food, especially tacos. I’m pretty sure my oldest can eat more tacos than me! I discovered these Crockpot Chicken Tacos on Pinterest almost a year ago, and I’ve made them at least every other week ever since (in fact, I’m making them again this week!). We almost always use the chicken for tacos (crunchy shells only…God forbid we try soft shell!), but the husband and I usually enjoy the leftovers for late night nachos. I highly recommend this one…definitely a Rookie Baker household favorite!

1 (1 oz) Envelope Taco Seasoning
6 Boneless Skinless Chicken Breasts, thawed
1 (16 oz) jar Salsa

Dump all ingredients into a crockpot and give it a little stir to blend the seasoning with the salsa. You do not need to add any water to the taco seasoning. Cook on high for 4 to 6 hours or on low for 6 to 8 hours. When done, the chicken should shred easily when stirred with a fork.

Source:  Tasty Kitchen via Chocolate Therapy

Chili Tortellini

Chili Tortellini

I love Halloween. Not the super scary, gory side of things, but more the “oh look how cute the kids are!” side of things. I love watching my boys get so excited to pick out costumes, and the anticipation of trick-or-treating. This year my oldest settled on Iron Man (after an excruciating 20 minute debate in Target) and my youngest excitedly and quickly chose Cookie Monster. They were spoiled this year in that they got to go trick-or-treating three times. Our last trick-or-treating adventure was on Halloween and, as luck would have it, while the weather was unusually warm, it was also terribly rainy and windy. The husband took our oldest around the neighborhood with some friends, but I hung back with the youngest and my mother-in-law to stay dry (he’s 2…he had more fun handing out candy in his Cookie Monster costume!).

While the husband took our oldest around the neighborhood, I whipped up this FANTASTIC chili tortellini. I’ve made this several times before, and I knew it would be the perfect comfort food after a wet trick-or-treating mission. As usual, all three of my guys gobbled this up, and I did too! This recipe makes a large amount, which makes it great for feeding a crowd, or feeding your family for several days. As with most chili and soup recipes, the leftovers are even better! I suspect we’ll be eating this a lot this fall and winter.

1 pound dry tortellini
2 tablespoons extra virgin olive oil
1 cup finely chopped onion
2 tablespoons fresh minced garlic
1 pound lean ground beef
1/2 teaspoon kosher salt
1/4 teaspoon freshly ground black pepper
1/4 teaspoon garlic salt
32 ounces reduced sodium chicken broth
two 15 ounce cans beans, I used black and red beans, whatever you prefer
15 ounce can Rotel diced tomatoes MILD version
2 tablespoons ground cumin
1 1/2 tablespoons chili powder
1/2 cup fresh chopped cilantro

Cook tortellini according to package directions.  Heat olive oil into a large dutch oven over medium heat.  Saute onion and garlic for about 5 minutes then brown beef until browned.  Drain if necessary.  Add broth, tomatoes, beans, cumin, chili powder and cilantro.  Add cooked tortellini and heat for 10 minutes or until hot.  Reduce heat to a low simmer until ready to serve.

Source:  Picky Palate

Slow Cooker Shredded Beef for Tacos

Shredded Beef

As I mentioned in my last post, things have been crazy around here the last several months.  And of course once things started calming down toward the end of summer and we got used to the slower pace of life, my oldest started school and a week later started swim classes that run four nights week.  Oh, and the husband started traveling every single week, which is outside the norm for his job.  The first few weeks of our new schedule, it was all I could do to get ANY food on the table for my boys, and what I could get on the table wasn’t all that great.

I finally sat down one Sunday evening and started meal planning again.  I’ve found that taking that bit of time to figure out what to feed my zoo crew each night made my weeks run much more smoothly.  I take the very little free time I have during the day to prep as much as possible to make getting dinner on the table relatively easy.  One of the tools I’ve utilized the most recently is my slow cooker.  There is nothing better than throwing a bunch of food in that sucker first thing in the morning, and have a great dinner on the table by 5:00.

It’s no secret that we love Mexican food.  I could seriously eat some form of it every night and never tire of it.  Combining my new favorite kitchen tool with my family’s favorite food?  Now that makes for a great weeknight!  This shredded beef tastes great in tacos, burrito bowls (see above), quesadillas, and heck, even on it’s own!  With just a few minutes of prep work in the morning, you can have this delicious meal on the table by dinner time.  I’ve already made this several times, and it’s on my meal plan again this week.  It’s that good.

1 (2 lb.) boneless beef roast
1 Tbsp. canola oil
1 onion, sliced
4 cloves garlic, minced
1/2 Tbsp. tomato paste
3/4 cup beef broth
1/2 tsp. dried parsley
2 tsp. chili powder
1.5 tsp. ground cumin
1/2 tsp. cayenne
1/2 tsp. paprika
1/2 tsp. dried oregano

Heat a large, heavy bottomed skillet over medium high heat, and add the oil. Sprinkle the beef roast liberally with salt and pepper. Once the oil is hot, add the roast to the pan and brown on all sides, about 2 minutes per side. Place in the crock pot.

To the pan, add the onion and cook for about 2 minutes before stirring in garlic and tomato paste. After another minute, stir in the beef broth and spices. Scrape up any browned bits, and then pour the seasoned broth and onions over the top of the roast.

Cook on low for 8-10 hours. Shred with two forks and allow to cook for a few minutes longer. (To soak up any extra liquid, you can turn the crock pot to high for a little bit after shredding the beef.)

Source:  Elly Says Opa

Cilantro Lime Rice

Cilantro Lime Rice

Guess who’s back?  Back again?  Rookie’s back…tell a friend!  Guess who’s back, guess who’s back, guess who’s back…

Ok, that was a total college flashback, but, I’M BACK!!  Wow, life has been CRAZY in The Rookie Baker household, most of which has been the good kind of crazy, but crazy nonetheless.  Shortly after I wrote my last post (8 months ago…), we made the crazy decision to sell our house and buy my in-law’s house in a town 20 minutes away.  What we didn’t expect was for that house to sell in less than 3 weeks, during the husband’s busy travel season.  We survived it, and in early June we finally moved to our new home!  It is much smaller and the kitchen leaves much to be desired (sooooo hoping to do a kitchen renovation in the semi-near future), but we love it here!  My in-laws live 5 minutes away (a good thing for sure!) and our boys have already made friends in our new town.

Speaking of those boys, both of them have had birthdays since my last post!  I am the proud mom of a 5 year old and a 2 year old.  Crazy.  Our oldest started kindergarten in September and is enjoying a swim class four nights a week.  That alone keeps me busy, but then add in the tiny one’s therapy sessions, doctor’s appointments, library story hours, weekly mommy and me swim class, volunteering for the PTA, and the husband’s hectic travel schedule, and I swear all I do is run around like a crazy person!  Cooking has certainly taken a back burner over the last, well, 8 months, but I’m slowly getting back in the kitchen!  Because our schedule is chaotic most weeks, I’ll likely be posting a good number of weeknight friendly recipes that are kid (and adult) tested and approved.

Enough about me, let’s talk about this recipe for Cilantro Lime Rice.  We are HUGE Chipotle fans, and were thrilled when one opened in our old town just five minutes from our house.  Let’s just say we may have singlehandedly kept them in business as we navigated the chaos of selling our house.  I love their burrito bowls and was on the hunt for a recipe I could make at home so I could recreate this family favorite.  Skinny Taste to the rescue!  This rice tastes exactly like the rice at Chipotle, and dare I say it, perhaps even better.  I make this at least once a week as the base for burrito bowls.  Stay tuned for a few great slow cooker recipes that pair perfectly with this rice!  On its own or as the base of a burrito bowl, this rice is truly a family favorite!

Cilantro Lime Rice

1 cup extra long grain rice or basmati rice
1/2 lime, juiced
2 cups water
1 tsp salt
3 tbsp fresh chopped cilantro
3 tsp vegetable oil

In a small heavy pot, add rice, water, 1 tsp oil and salt. Boil on high until most of the water evaporates. When the water just skims the top of the rice, reduce to low and cover about 15 minutes. Shut off flame and keep covered an additional 5 minute.

In a medium bowl, combine chopped cilantro, lime juice, rice and remaining oil and toss until completely mixed.

Source:  Skinny Taste

Chicken Piccata with Orzo

chicken piccata w orzo

I married a red meat lover. If the husband had his choice, we would eat steak/roast/hamburgers every single night of the week. While I appreciate and enjoy red meat, and often order steak when we go out for dinner, I prefer to cook chicken at home. Generally it’s much healthier (we only do white meat here), and is almost always cheaper. I always laugh at his reaction when I tell him we’re having chicken for dinner as it usually involves a heavy sigh, or a complaint about us not eating enough red meat. The boys, on the other hand, love chicken and are always happy to have it for dinner. In fact, baby boy (who doesn’t really talk much yet), kicks his feet excitedly as I cut up his chicken and will start crying if I don’t get it on his high chair tray fast enough!

Suffice it to say, we eat A LOT of chicken, so I am constantly on the lookout for fast, healthy and delicious ways to jazz up our chicken dinners.  When I found this recipe on Pinterest, I instantly added it to our weekly meal plan.  I love chicken piccata and orzo, so this was the perfect combination!  The only change I made was cooking the orzo as done here as I think it adds more flavor and creaminess.  Everyone, including our resident red meat lover, enjoyed this to the point of complaining that there wasn’t more!  A healthy dinner loved by the whole family and on the table in 20 minutes?  Fantastic!

1 cup uncooked orzo
1 tablespoon butter
1 (14.5 ounce) can low sodium chicken broth
2 teaspoons grated lemon rind
4 (4-ounce) chicken cutlets
1/4 teaspoon kosher salt
1/4 teaspoon freshly ground black pepper
1 tablespoon olive oil
1/4 cup white wine
1/2 cup fat-free, lower-sodium chicken broth
1 tablespoon fresh lemon juice
1 tablespoon chilled butter, cut into small pieces
2 tablespoons chopped fresh parsley (I used 2 tsp dried parsley)

Melt butter in pan over medium heat.  Add orzo and stir 2-3 minutes to lightly toast.  Add broth; bring to a boil for 1 minute.  Turn heat to low, cover, and cook 15 minutes or until broth is almost absorbed and orzo is soft.  Stir in rind.

While orzo cooks, heat a large skillet over medium-high heat. Sprinkle chicken with salt and pepper. Add oil to pan; swirl to coat. Add chicken; cook 3 minutes on each side or until done. Remove from pan; keep warm. Add wine; cook 1 minute or until liquid almost evaporates, scraping pan to loosen browned bits. Add broth and lemon juice; bring to a boil. Cook 2 minutes or until reduced to 1/2 cup. Remove from heat; add butter, stirring until butter melts. Stir in parsley. Serve over orzo.

Source:  Slightly adapted from Cooking Light

Skillet Pork Chops with Rice and Parsley Butter

497

With our schedules as hectic as they’ve been lately, I’ve not done a great job of getting dinner on the table.  We’ve certainly kept the local restaurants in business as of late.  You know it’s bad when my tiny man, who is normally a big fan of Chinese takeout, politely requests a ham and cheese sandwich over chicken with broccoli.  Or, when the husband comes upstairs after work and doesn’t ask what’s for dinner, but where we’re ordering from tonight.  So, in an effort to minimize complaining and save our budget and waistlines, I’ve been on a quest to find quick weeknight meals that are healthy and delicious.

One thing I always have on hand in the freezer is pork chops.  I always stock up when the local grocery store has the buy one get one free sales.  When I saw this recipe, I was intrigued.  On the table in 30 minutes AND the side dish is included?  Count me in!  This was such a simple dinner to make, and, much to my surprise, full of flavor and delicious!  Everyone enjoyed it, even baby boy who, up until two months ago, wouldn’t eat anything other than baby food and yogurt.  That’s a win in my book!

4 tablespoons unsalted butter, softened and divided
2 tablespoons minced fresh parsley
2 1/4 cups low-sodium chicken broth, divided
1 cup long-grain white rice
4 (6- to 8-oz) boneless pork chops, 3/4 to 1 inch thick
1 medium onion, chopped fine
1 garlic clove, minced
1/2 teaspoon dried thyme

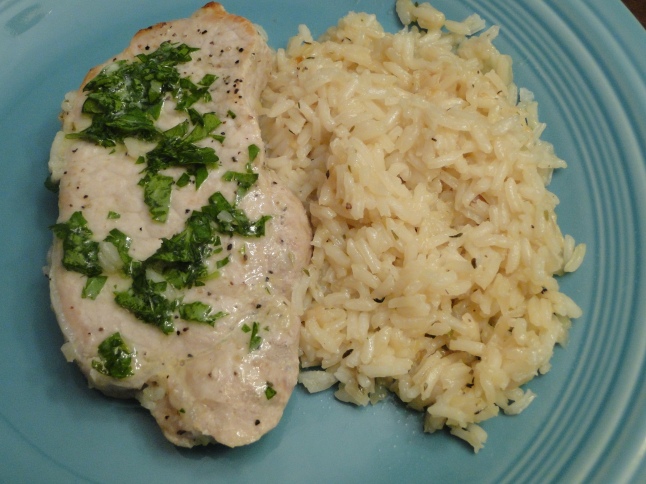
In a small bowl, stir 2 tablespoons of the butter together with the parsley. Set aside.

In a large microwave safe bowl, combine 1 cup of the chicken broth and the rice. Cover the bowl with plastic wrap and microwave for 6-7 minutes, or until the liquid has been completely absorbed (note: all microwaves vary, so keep an eye and maybe check yours early just in case). Be very careful when you remove the plastic wrap from the bowl, the steam is super hot!

While the rice is cooking, pat the pork chops dry with paper towels. Cut two slits, about 2 inches apart, in the fat cap around the outside edge of each pork chop (this will prevent them from curling up as they cook). Season both sides of the pork with salt and pepper. Set a 12-inch skillet over medium-high heat and add 1 tablespoon of the butter. When it’s melted and the pan is hot, add the chops. Brown on both sides, about 6-8 minutes total. Remove the pork chops to a plate and tent with foil.

Add the final tablespoon of butter to the skillet and melt, then add the onion and cook, stirring occasionally, until browned, about 6-7 minutes.  Stir in the garlic and thyme, cooking just until fragrant, about 30 seconds.

Add the rice and the remaining 1 1/4 cups of chicken broth to the skillet. Bring the mixture to a boil, the nestle the pork chops and any accumulated juices in the pan. Reduce the heat to medium-low and cover the pan. Cook for 10-14 minutes, or until the rice is tender and the pork is cooked to your desired doneness (it should register at least 145 F on an instant read thermometer). Top the pork with the parsley butter when serving.

Source:  Tracey’s Culinary Adventures, orginially from Cooks Country, August/September 2011

Tap, tap, tap…is this thing on?

Wow, so it appears I haven’t posted anything here since July!! I swear I’m still around, but haven’t been in my kitchen making anything even remotely bloggable (is that a word?). Without getting into too much detail, we’ve had some health issues here with our baby boy, and while he will be okay at the end of it all, the process of endless doctor appointments, tests, therapy, etc. has taken up a lot of my time, and what little time I have left it’s all I can do to get dinner on the table most nights. Add to that the needs of my very active four year old and a husband who’s been traveling a bit for work, and it’s been crazy here!

Thankfully things are settling down here and I’ve already begun to find time to get in the kitchen and try some new recipes (stay tuned for some actual recipe posts in the near future!). I’m so happy to get back to what I love…cooking and baking yummy meals for my three favorite guys! I hope you’ll continue to follow along with me!

Peanut Butter Cheerios Treats

Over the last several months, I’ve noticed that Joe is very interested in what I’m doing in the kitchen. He’s always asking questions on how things work and why (like any inquisitve 4 year old) and always wants to watch. When I saw this recipe on Pinterest, I saved it knowing it would be a good one to try with him. Baby boy was pretty sick one weekend, and Joe was getting restless since we were stuck at home, so I decided to pull this recipe out and give it a go. These treats are made just like Rice Krispie treats and were very fun to make with my tiny man! The flavor was great and we ate the entire pan over that weekend. If you’re looking for a fun treat for your kids to eat (and help make!), I recommend these for sure!

Peanut Butter Cheerios Treats

6 cups Peanut Butter Cheerios
2 Tablespoons butter
1/3 cup smooth peanut butter
10 ounces (approx. 40 ) regular sized marshmallows
1 cup chocolate chips

Prep a 9×13 pan with cooking spray or buttered parchment. In a pan over medium high heat melt the butter and peanut butter. Add in the marshmallows until you get a nice gooey mess. Add the Peanut Butter Cheerios and stir to combine making sure all of the cereal gets coated. Press into the prepped pan and while the cereal is still warm, sprinkle the chocolate chips on top so they melt slightly. Let cool and cut into squares. These taste best if served the same day.

Source:  Just Jenn Recipes

Copy Cat Chick-Fil-A Chicken Nuggets – Crazy Cooking Challenge #11

This month’s Crazy Cooking Challenge theme was fried chicken. I was excited and not excited about this challenge all at the same time. I’ve been trying to lose this stubborn baby weight, so accordingly, I’ve been eating a bit more healthy. Fried chicken isn’t known for its health benefits. However, I’ve never fried anything before, and I love to try new things in the kitchen, so off I went in search of the perfect fried chicken recipe. I bookmarked seven different recipes, but when I saw this recipe for a copy cat of Chick-Fil-A’s delicious chicken nuggets, I knew I had a winner! Chick-Fil-A is without a doubt my favorite fast food restaurant, and I probably ate there once a week when we still lived in Virginia. The small town we live in now has every single fast food joint known to man, except my beloved Chick-Fil-A, so I’ve had to do without except for the rare treat if I’m shopping somewhere that has one. So Chick-Fil-A, if you happen upon my little blog here, please, please, please come to my town! I promise I’ll visit frequently. 🙂

Photobucket

I found this gem on Pinterest (of course!) and it led me to the fabulous Amy of My Name is Snickerdoodle. This must be a popular recipe, because it has been pinned over 250,000! I can see why it is so popular, because it was so, so, so good and tasted almost exactly like the chicken nuggets at Chick-Fil-A! The chicken bites soak in a milk and egg mixture for a few hours, then they are coated in a mixture of flour, powdered sugar, salt, and pepper, and finally fried in either peanut or canola oil (or in my case a mixture of both) until crispy and cooked through. So easy and so good! We devoured these for dinner tonight, and I will certainly make them again! I can’t wait to see what everyone else cooked up this month…I am on the lookout for a more traditional fried chicken recipe to try!

2 skinless and boneless chicken breasts
1 cup milk
1 egg
1 1/4 cups flour
2 TBSP powdered sugar
2 tsp salt
1 tsp pepper
peanut oil (is best) or canola oil

In a medium bowl whisk the egg and stir in the milk. Trim any fat away from chicken. Cube chicken into bite size pieces. Place chicken in milk mixture,and cover. Let it ‘marinate’ for 2-4 hours in the fridge. This will make the chicken very nice and tender. In a gallon size resealable baggie combine flour, powdered sugar, salt and pepper. Seal and shake to combine. Place about 2 inches of oil in a medium deep pot. Over medium high heat (more towards the high side) heat oil until hot. If using a thermometer let the temperature reach 375°. If you don’t have a fancy gadget like most people, I always test my oil by dropping a few drops of water into it. You want it to sizzle and not pop too much. Adjust your heat if necessary. Using a fork or tongs remove cut chicken from milk mixture and place in the flour mixture. Seal and shake until nuggets are completely coated. Place about a 6-8 nuggets into hot oil and let them cook until golden brown, turning half way through once the edge of your chicken starts to turn white. About 1 minute each side. Always double check to see if any chicken you make is cooked through. I always just make a tiny cut to see if it’s pink. Remove and drain on a paper towel. Repeat until all nuggets are cooked. Serve with your favorite sauce!

Powered by Linky Tools

Click here to enter your link and view this Linky Tools list…

Skinny Taco Dip

The fact that this fabulous taco dip even made it to the tiny man’s 4th birthday party is a miracle. As people were arriving to the party (including people I’ve never met before who were the parents of some of tiny man’s school friends), one of the folding tables we had set up with the food collapsed as we were setting up (apparently the husband didn’t quite lock the legs of the table when he set it up…). Thankfully my sister-in-law, niece, and BFF were right there (and thankfully I was not as I was already a nervous wreck and spazing out about other things) and saved the day, and all of the food! And it’s a good thing, because the taco dip was far and away the most popular dish at the party, and I gave out the recipe to several folks as they were leaving! I threw this together about 20 minutes before the start of the party, it was that easy to make. If you’re looking for an easy, healthy, and delicious appetizer for a get together, give this one a shot! Just make sure you put it on a stable table.

8 oz 1/3 less fat Philadelphia cream cheese
8 oz reduced fat sour cream
16 oz jar mild salsa
1 packet taco seasoning
2 cups iceberg lettuce, shredded
2 large tomatoes, diced
1 cup reduced fat shredded cheddar cheese
2.25 oz black olives, drained

In a large bowl combine cream cheese, sour cream, salsa and taco seasoning and mix well with an electric mixer. Spread on the bottom of a large shallow glass dish. Top with shredded lettuce, tomatoes, shredded cheese and black olives. Serve with baked tortilla chips.

Source:  Skinnytaste