Crockpot Chicken Tacos

Slow Cooker Chicken Tacos

Another day, another crockpot recipe! Seriously, this is the EASIEST “recipe” ever, and it is so, so good! It’s no secret we’re big fans of Mexican food, especially tacos. I’m pretty sure my oldest can eat more tacos than me! I discovered these Crockpot Chicken Tacos on Pinterest almost a year ago, and I’ve made them at least every other week ever since (in fact, I’m making them again this week!). We almost always use the chicken for tacos (crunchy shells only…God forbid we try soft shell!), but the husband and I usually enjoy the leftovers for late night nachos. I highly recommend this one…definitely a Rookie Baker household favorite!

1 (1 oz) Envelope Taco Seasoning
6 Boneless Skinless Chicken Breasts, thawed
1 (16 oz) jar Salsa

Dump all ingredients into a crockpot and give it a little stir to blend the seasoning with the salsa. You do not need to add any water to the taco seasoning. Cook on high for 4 to 6 hours or on low for 6 to 8 hours. When done, the chicken should shred easily when stirred with a fork.

Source:  Tasty Kitchen via Chocolate Therapy

Cilantro Lime Rice

Cilantro Lime Rice

Guess who’s back?  Back again?  Rookie’s back…tell a friend!  Guess who’s back, guess who’s back, guess who’s back…

Ok, that was a total college flashback, but, I’M BACK!!  Wow, life has been CRAZY in The Rookie Baker household, most of which has been the good kind of crazy, but crazy nonetheless.  Shortly after I wrote my last post (8 months ago…), we made the crazy decision to sell our house and buy my in-law’s house in a town 20 minutes away.  What we didn’t expect was for that house to sell in less than 3 weeks, during the husband’s busy travel season.  We survived it, and in early June we finally moved to our new home!  It is much smaller and the kitchen leaves much to be desired (sooooo hoping to do a kitchen renovation in the semi-near future), but we love it here!  My in-laws live 5 minutes away (a good thing for sure!) and our boys have already made friends in our new town.

Speaking of those boys, both of them have had birthdays since my last post!  I am the proud mom of a 5 year old and a 2 year old.  Crazy.  Our oldest started kindergarten in September and is enjoying a swim class four nights a week.  That alone keeps me busy, but then add in the tiny one’s therapy sessions, doctor’s appointments, library story hours, weekly mommy and me swim class, volunteering for the PTA, and the husband’s hectic travel schedule, and I swear all I do is run around like a crazy person!  Cooking has certainly taken a back burner over the last, well, 8 months, but I’m slowly getting back in the kitchen!  Because our schedule is chaotic most weeks, I’ll likely be posting a good number of weeknight friendly recipes that are kid (and adult) tested and approved.

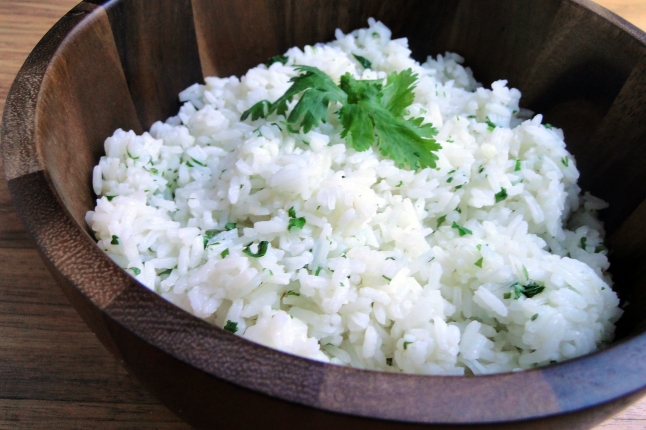
Enough about me, let’s talk about this recipe for Cilantro Lime Rice.  We are HUGE Chipotle fans, and were thrilled when one opened in our old town just five minutes from our house.  Let’s just say we may have singlehandedly kept them in business as we navigated the chaos of selling our house.  I love their burrito bowls and was on the hunt for a recipe I could make at home so I could recreate this family favorite.  Skinny Taste to the rescue!  This rice tastes exactly like the rice at Chipotle, and dare I say it, perhaps even better.  I make this at least once a week as the base for burrito bowls.  Stay tuned for a few great slow cooker recipes that pair perfectly with this rice!  On its own or as the base of a burrito bowl, this rice is truly a family favorite!

Cilantro Lime Rice

1 cup extra long grain rice or basmati rice
1/2 lime, juiced
2 cups water
1 tsp salt
3 tbsp fresh chopped cilantro
3 tsp vegetable oil

In a small heavy pot, add rice, water, 1 tsp oil and salt. Boil on high until most of the water evaporates. When the water just skims the top of the rice, reduce to low and cover about 15 minutes. Shut off flame and keep covered an additional 5 minute.

In a medium bowl, combine chopped cilantro, lime juice, rice and remaining oil and toss until completely mixed.

Source:  Skinny Taste

Chicken Piccata with Orzo

chicken piccata w orzo

I married a red meat lover. If the husband had his choice, we would eat steak/roast/hamburgers every single night of the week. While I appreciate and enjoy red meat, and often order steak when we go out for dinner, I prefer to cook chicken at home. Generally it’s much healthier (we only do white meat here), and is almost always cheaper. I always laugh at his reaction when I tell him we’re having chicken for dinner as it usually involves a heavy sigh, or a complaint about us not eating enough red meat. The boys, on the other hand, love chicken and are always happy to have it for dinner. In fact, baby boy (who doesn’t really talk much yet), kicks his feet excitedly as I cut up his chicken and will start crying if I don’t get it on his high chair tray fast enough!

Suffice it to say, we eat A LOT of chicken, so I am constantly on the lookout for fast, healthy and delicious ways to jazz up our chicken dinners.  When I found this recipe on Pinterest, I instantly added it to our weekly meal plan.  I love chicken piccata and orzo, so this was the perfect combination!  The only change I made was cooking the orzo as done here as I think it adds more flavor and creaminess.  Everyone, including our resident red meat lover, enjoyed this to the point of complaining that there wasn’t more!  A healthy dinner loved by the whole family and on the table in 20 minutes?  Fantastic!

1 cup uncooked orzo
1 tablespoon butter
1 (14.5 ounce) can low sodium chicken broth
2 teaspoons grated lemon rind
4 (4-ounce) chicken cutlets
1/4 teaspoon kosher salt
1/4 teaspoon freshly ground black pepper
1 tablespoon olive oil
1/4 cup white wine
1/2 cup fat-free, lower-sodium chicken broth
1 tablespoon fresh lemon juice
1 tablespoon chilled butter, cut into small pieces
2 tablespoons chopped fresh parsley (I used 2 tsp dried parsley)

Melt butter in pan over medium heat.  Add orzo and stir 2-3 minutes to lightly toast.  Add broth; bring to a boil for 1 minute.  Turn heat to low, cover, and cook 15 minutes or until broth is almost absorbed and orzo is soft.  Stir in rind.

While orzo cooks, heat a large skillet over medium-high heat. Sprinkle chicken with salt and pepper. Add oil to pan; swirl to coat. Add chicken; cook 3 minutes on each side or until done. Remove from pan; keep warm. Add wine; cook 1 minute or until liquid almost evaporates, scraping pan to loosen browned bits. Add broth and lemon juice; bring to a boil. Cook 2 minutes or until reduced to 1/2 cup. Remove from heat; add butter, stirring until butter melts. Stir in parsley. Serve over orzo.

Source:  Slightly adapted from Cooking Light

Strawberry Orange Oatmeal Smoothie – Crazy Cooking Challenge #10

This month’s Crazy Cooking Challenge theme was fruit smoothies, which couldn’t have been more perfectly timed. I started a fitness boot camp on May 1st and since it falls during dinner time two nights a week and early on a Saturday morning, I’ve been relying on smoothies as a quick and healthy snack/meal about an hour or so before my workouts. I’ve seen oatmeal smoothies on Pinterest over the last few months, and when I saw this one on Bran Appetit, I knew I found the one I really wanted to try! I also got lucky and found another healthy living blog that I love and cannot wait to try more of her recipes!  Since I’m on a big smoothie kick, I REALLY cannot wait to see what everyone came up with this month…I imagine there are going to be a ton of great options!

Photobucket

So, about this fabulous smoothie! It was very easy to throw together and is made with ingredients that I almost always have around the house, except for the chia seeds, which I found on Amazon. I actually really enjoyed the nutty flavor of the oatmeal in this, which was subtle but definitely there. It was very filling too, which is exactly what I am looking for prior to hard workout. The husband and tiny man were not as impressed with the oatmeal flavor, which was fine because there was more for me! I cannot wait to try some different oatmeal smoothie recipes!

1/2 cup oats
1/2 cup milk
1 tsp chia seeds
1 cup frozen or fresh strawberries
1/4 cup orange juice
1/2 cup milk
1/2 cup ice
1/4 tsp vanilla

Add the oats and 1/2 cup milk to your blender and let it sit for at least 30 minutes or overnight, if you can, to soften the oats a little.

In the morning, add the strawberries, orange juice, milk, ice, and vanilla and blend until the mixture is smooth.

Source:  Bran Appetit

Powered by Linky Tools

Click here to enter your link and view this Linky Tools list…

Pan-Roasted Chicken with Lemon-Garlic Green Beans and Potatoes

This is yet another Pinterest find that looked intriguing.  The husband and my toddler man both love green beans, and I love lemon, so I added to my meal plan for the following week.  This dish was so easy to throw together and works great for a weeknight if you have the time for everything to cook in the oven.  We all really enjoyed it and had absolutely no leftovers.  I, a very vocal green bean hater, even ate and ENJOYED the green beans!  I’m slowly coming around to vegetables…very slowly, but this dish was a good step for me and something I will make again very soon!

Pan-Roasted Chicken with Lemon-Garlic Green Beans and Potatoes

1 pkg boneless, skinless chicken breasts (I used 1.5 pounds)
3/4 lb fresh green beans, ends trimmed, washed
8 small red potatoes, washed and quartered, skin-on
1 lemon
5 tbsp olive oil
4 cloves minced garlic
1 tsp kosher salt
1/2 tsp fresh ground black pepper
Lemon-Pepper seasoning

Preheat oven to 450.

Mix your olive oil, the juice of the lemon, salt, pepper and garlic in a medium-sized bowl.  Toss the green beans in the mixture, then using tongs remove the green beans to a roaster or casserole dish (coated with nonstick spray), leaving the liquid in the bowl.

Now toss the potatoes in the liquid, and using a slotted spoon remove them and add to the green beans.

Toss the chicken in the mixture and then place the chicken on top of the green beans and potatoes.  Drizzle any remaining liquid in the bowl over the chicken.  Sprinkle lemon pepper seasoning on top of the chicken.

Bake/roast for 50 minutes, then remove the chicken from the pan and set aside and cook the green beans and potatoes for another ten minutes or so – until the potatoes pierce easily with a fork.  While that’s cooking, check if your chicken is done.

Return the chicken to the pan and serve.

Source:  Slightly adapted from Cooking with Christen, originally adapted from Real Simple

Pork Chops with Cherry Sauce

My mom HATES any kind of fruit pared with meat, so growing up, the thought always disgusted me as well.  As I’ve gotten older, I’ve started to be more intrigued by the combination and have set out to try some savory dishes that incorporate fruit as well.  I bookmarked this recipe awhile ago knowing the husband would probably love it, and I finally got around to making it, thanks to the dried cherries I had leftover from my planned Christmas baking that never happened. 

If I didn’t enjoy the meat/fruit combo before, I certainly do now!  This was phenomenal – quick, easy, and very tasty.  I had it on the table in about 15 minutes.  Absolute perfection.  The only change I made was using lean pork chops instead of the pork tenderloin because that’s what I had on hand.

Pork Chops with Cherry Sauce

4 boneless pork chops, trimmed of all visible fat
1/2 teaspoon salt, divided
1/4 teaspoon pepper
3 teaspoons olive oil, divided
2 tablespoons chopped shallots
3/4 cup low-sodium chicken broth
2 tablespoons balsamic vinegar
1/4 cup dried tart cherries

Season the pork  chops with 1/4 teaspoon of salt and pepper. Heat 2 teaspoons oil in a large nonstick skillet over a medium-high heat and cook the meat until there is just a slight blush in the center about 3 minutes per side. Transfer the meat to a plate and tent with foil.

Add the remaining teaspoon of oil and the shallots to the pan and saute until they begin to soften, about 1 minute. Add the chicken broth, balsamic vinegar, the remaining 1/4 teaspoon of salt and the cherries and cook until the liquid is reduced by half, about 4 minutes. Season with salt and pepper, to taste. Pour the sauce over the pork chops and serve.

Source:  Ellie Krieger via Food Network’s Website

Garlic Marinated Pork Chops – AKA “Robot Steak”

So, you’re wondering what in the world these pork chops have to do with “robot steak”, right?  Here’s the short story.  The toddler man was watching a Sesame Street episode that involved robots, and he spent the better part of the day I made these pretending he was a robot.  ALL.DAY.LONG.  It’s cute for about the first 10 minutes, then it gets mindnumbingly annoying.  But we never thought the day would come when robots were allowed in our home, so I roll with it.  Anyway, as I was putting these under the broiler, he exclaimed very excitedly, “Robot Joe is VERY excited for robot steak!”.  Hilarious.

Now, the reason all of this robot stuff is quite amusing is that he used to be TERRIFIED of robots.  Starting at about 18 months old, he would screech in terror every.single.time he saw a robot, especially the ones on Sesame Street.  We started recording all of the episodes and previewing them (on fast forward) after he would go to bed to make sure there were no robot episodes anywhere ever.  This lasted until about 4 months ago when he exclaimed that he now loved robots.  To the point that he has requested a robot party for his 4th birthday in June.  I’m still befuddled about this, but we’re planning a robot party for June.

By the way, these pork chops were insanely easy, and insanely good.  I like that combination.  A little bit of spicy, but still very kid friendly.  Don’t skimp on the salt either…I forgot to add it, and they would have been much, much better with it.

Garlic Marinated Pork Chops – AKA “Robot Steak”

4 (6 oz each) lean boneless pork chop
4 cloves garlic, crushed
1 tsp cumin
1 tsp chili powder
1 tsp paprika
1/2 lime, juice of
lime zest
salt and fresh pepper

Trim any fat off pork. In a large bowl season pork with garlic, cumin, chili powder, paprika, salt and pepper. Squeeze lime juice and some zest from the lime and let it marinade at least 20 minutes.

Line broiler pan with foil for easy clean up. Place pork chops on the broiler pan and broil about 4-5 minutes on each side or until nicely browned.

Source:  Skinnytaste


Dijon Roasted New Potatoes

These potatoes are amazing.  Seriously.  I’m a huge fan of potatoes in general, but these, well, these are my most favorite potatoes I’ve had to date.  The Dijon mustard makes these crispy on the outside without having to use too much oil.  The husband hates Dijon mustard, and he gobbled these up, so don’t get turned off if you’re not a Dijon fan.  Easy, delicious, and healthy.  Pefection 🙂

Dijon Roasted New Potatoes
Servings:
Points+: 4 per serving

1 spray cooking spray (I used my Misto)
2 Tbsp Dijon mustard
1 tsp olive oil
3/4 tsp paprika
1/2 tsp table salt
1/4 tsp dried thyme
1/4 tsp ground black pepper
1 1/2 pounds uncooked new potatoes, red or white, quartered or halved

Preheat oven to 425.  Coat a 9×13 baking dish with cooking spray.

In a large bowl, whisk together the mustard, olive oil, paprika,salt, thyme, and pepper; add potatoes and stir to coat.

Transfer potatoes to prepared baking dish and roast 15 minutes; stir and roast until tender on the inside, about 15 to 20 minutes more.  Yields about 1 1/4 cups per serving.

Source:  Weight Watchers

Laughing Cow Chicken

Laughing Cow cheeses are one of my most favorite healthy snacks.  Paired with some reduced-fat Triscuits, it makes for a satisfying evening snack.  When I saw this recipe for chicken stuffed with the cheese, I had it on our menu plan immediately.  My favorite flavor is Garlic & Herb, which is what I used for this chicken.  Let me tell you, for such a simple and quick dinner, this was delicious.  I could have eaten all four chicken breasts I made it was that good.  Thankfully the husband and toddler agreed with my review, and they ate up the rest of this.  I’m sure this will be a staple in our dinner rotation as it was so easy to make. 

Laughing Cow Chicken

4 thinly sliced chicken breasts
4 wedges Laughing Cow Garlic & Herb cheese
Cooking spray
1/2 cup Italian seasoned panko

Lay each chicken breast flat.  Spread one wedge of cheese over one side of each chicken breast.  Roll up and seal with a toothpick.  Spray the chicken with cooking spray and cover with panko.  Place on baking sheet.  Spray breaded chicken breasts with more cooking spray.  Bake at 400 degrees for 18-20 minutes or until chicken is cooked through.  Remove toothpicks and serve.

Source:  Adapted from Macaroni and Cheesecake; originally adapted from Elizabeth’s Cooking Experiments

Sesame-Miso Cucumber Salad

One of our favorite summer side dishes is a simple cucumber salad with bottled Italian dressing that sometimes includes some tomatoes or onions.  I’d say we probably have this 3-4 nights a week.  But let’s face it, sometimes the same old same old gets boring, right?  Enter this yummy recipe for cucumber salad with some great Asian flavors!  We had this with Sesame Teriyaki Chicken and it made for a great dinner.  The best part is it only took an extra 2 minutes or so to mix up the dressing for this salad, so I’m certain we’ll see this frequently at our dinner table.  Enjoy!

Sesame -Miso Cucumber Salad

1 1/2 tablespoons sesame seeds, toasted (I forgot these, but will definitely add next time!)
2 tablespoons white miso (soybean paste) or lower-sodium soy sauce (I used soy sauce)
1 tablespoon rice vinegar
1 tablespoon honey
1 tablespoon hot water
1 teaspoon crushed red pepper
2 teaspoons dark sesame oil
4 cups thinly sliced seeded cucumber

Combine first 7 ingredients in a large bowl, stirring with a whisk. Add cucumber; toss to coat.