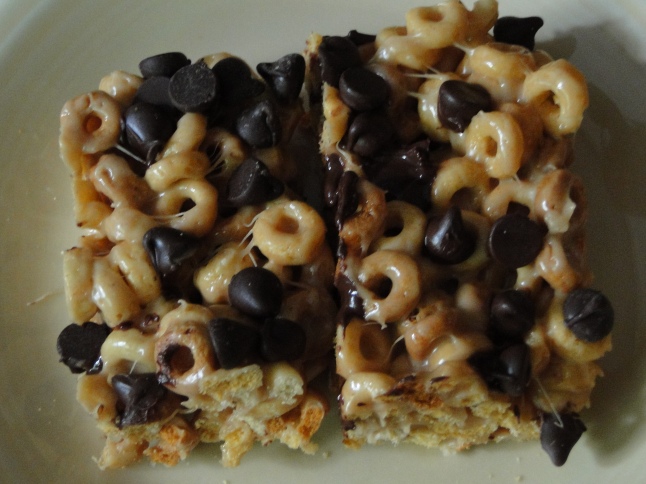
Peanut Butter Cheerios Treats

Over the last several months, I’ve noticed that Joe is very interested in what I’m doing in the kitchen. He’s always asking questions on how things work and why (like any inquisitve 4 year old) and always wants to watch. When I saw this recipe on Pinterest, I saved it knowing it would be a good one to try with him. Baby boy was pretty sick one weekend, and Joe was getting restless since we were stuck at home, so I decided to pull this recipe out and give it a go. These treats are made just like Rice Krispie treats and were very fun to make with my tiny man! The flavor was great and we ate the entire pan over that weekend. If you’re looking for a fun treat for your kids to eat (and help make!), I recommend these for sure!

Peanut Butter Cheerios Treats

6 cups Peanut Butter Cheerios
2 Tablespoons butter
1/3 cup smooth peanut butter
10 ounces (approx. 40 ) regular sized marshmallows
1 cup chocolate chips

Prep a 9×13 pan with cooking spray or buttered parchment. In a pan over medium high heat melt the butter and peanut butter. Add in the marshmallows until you get a nice gooey mess. Add the Peanut Butter Cheerios and stir to combine making sure all of the cereal gets coated. Press into the prepped pan and while the cereal is still warm, sprinkle the chocolate chips on top so they melt slightly. Let cool and cut into squares. These taste best if served the same day.

Source:  Just Jenn Recipes

S’More Cookie Bars

I’ve made these deliciuos S’More Bars many times, and was surprised I didn’t actually have them on my blog, so here they are!  For some reason, I was craving these last weekend, and when my brother and sister-in-law called to make plans for dinner, I finally had an excuse to make them.  They were a huge hit with everyone (especially the toddler), and I enjoyed them for breakfast (and snacks…) for a few days after.  They really do taste like a s’more, so if you’re a big s’more fan like we are, I highly recommend these!

S’More Cookie Bars

1/2 cup (1 stick) butter or margarine, softened
3/4 cup sugar
1 egg
1 teaspoon vanilla extract
1-1/3 cups all-purpose flour
3/4 cup graham cracker crumbs
1 teaspoon baking powder
1/4 teaspoon salt
5 (1.55 oz. each) HERSHEY’S Milk Chocolate Bars
1 (7-ounce) jar marshmallow creme

Heat oven to 350°F. Grease 8-inch square baking pan.

Beat butter and sugar in large bowl until light and fluffy. Add egg and vanilla; beat well. Stir together flour, graham cracker crumbs, baking powder and salt; add to butter mixture, beating until blended. Press half of dough into prepared pan.

Arrange chocolate bars over dough, breaking as needed to fit. Spread with marshmallow creme. Scatter bits of remaining dough over marshmallow; carefully press to form a layer.

Bake 30 to 35 minutes or until lightly browned. Cool completely in pan on wire rack. Cut into bars. 16 bars.

Source:  Adapted from Hershey’s

BWD: Brrr-ownies

It’s always a hard decision when it’s your turn to select the Baking with Dorie recipe.  Her cookbook is so full of amazing looking recipes!  This is the third recipe I’ve chosen for our group, and each time I’ve chosen, this recipe for Brrr-ownies has always been my second choice.  Well, it was time for it to be my first choice, and I’m so glad that it was! 

I had planned to make these in advance since I’m currently on vacation with the toddler visiting my mom in Florida (hooray for warmth and sunshine!).  Unfortunately, I ran out of time, but thankfully my mom was up for some yummy brownies, so we made them this evening.  We both absolutely loved them, and that’s saying a lot for me since sweets have been my nemesis since I found out I was pregnant three months ago.  These brownies are fudgey and full of chocolate mint deliciousness.  They aren’t overly sweet or rich, so it is easy to eat more than one, or two, or three, or…(what can I say, the baby loved them!!).

See below for the recipe for these fantastic brownies.  You can also find the recipe on page 103 of Dorie Greenspan’s Baking: From My Home to Yours.  To see how everyone else enjoyed these tasty treats, head on over to the BWD page and check out the blogroll.  Next up, we’re making Bill Bill’s Carrot Cake.  YUM!

Brrr-ownies

5 Tbsp unsalted butter, cut into 5 pieces
3 ounces bittersweet chocolate, coarsely chopped
3 ounces unsweetened chocolate, coarsely chopped
2/3 cup sugar
2 large eggs
1 tsp pure vanilla extract
Pinch of salt
1/3 cup all-purpose flour
1 cup (6 ounces) York Peppermint Patties, chopped into bits

Getting Ready:  Center a rack in the oven and preheat the oven to 325 degrees.  Line an 8-inch square baking pan with foil, butter the foil and place the pan on a baking sheet. 

Set a heatproof bowl over a saucepan of gently simmering water.  Put the butter in the bowl, top with the chopped chocolates and stir occasionally until the ingredients are just melted – you don’t want them to get so hot that the butter separates.  Remove the bowl from the pan of water.

With a whisk, stir in the sugar.  Don’t be concerned when your smooth mixture turns grainy.  Whisk in the eggs one by one.  Add the vanilla and whisk vigorously to bring the batter together and give it a shine before gently stirring in the salt and flour; stir only until incorporated.  Switch to a rubber spatula and fold in the peppermint pieces.  Scrape the batter into the pan and smooth the top with the rubber spatula.

Bake the brownies for 30 to 33 minutes, or until the top is dull and a thin knife inserted into the center comes out clean.  (The tip of the knife may be a touch streaky.)  Transfer the pan to a rack and cool to room temperature. 

When they are completely cool, turn out onto a rack, peel away the foil and invert onto a cutting board.  Cut into sixteen 2-inch squares.

Source:  From Baking: From My Home to Yours, page 103

BWD: Brownie Buttons

First, happy one year anniversary to the Baking with Dorie group!  I’ve been a member since June, and I’ve really enjoyed all of the baking challenges thus far, especially because most of the recipes I’ve done are things I probably wouldn’t have tried otherwise.  A big thank you to everyone in our little group for continuing to challenge me in the kitchen!  The entire group chose this recipe to celebrate the one year anniversary of our group.  Our founder, Grapefruit over at Needful Things, has the recipe posted on her blog.  You can also find it on pages 106-107 of Dorie’s Baking: From My Home to Yours

Second, I’m so glad to be back in the kitchen with BWD and baking some goodies!  I think the boys have definitely missed having sweet treats around the house.  These little bite size brownies were so easy to make, and so easy for them to snack on throughout the day.  They both loved them!  Unfortunately, sweets and I have not gotten along at all since the morning sickenss stareted, so I didn’t try these, but I will definitely make them again once I’m feeling better.

Up next, we’re making Honey Nut Scones.  Can’t wait to try that one!

BWD: World Peace Cookies

Check out that picture!  The husband got me a new fabulous camera for Christmas that takes phenominal food photos!  I am in love and can’t wait to play around with it some more.  Enough about that though, let’s move on to these delcious, decadent, chocolate cookies!  Rebecca from beurrista chose these World Peace Cookies for this week’s Baking with Dorie recipe, and what a great choice she made.  You can find the recipe on her blog, or on pages 138-139 of Dorie Greenspan’s Baking: From My Home to Yours.

I had a heck of a time getting these cookies ready for baking.  The dough itself comes togther easily and chills in the refrigerator for 3 hours before you can slice and bake these.  That is where my trouble started.  The bittersweet chocolate chips I bought were big, and only after I got home did I realize Dorie said chopped bittersweet chocolate or mini chocolate chips.  Whoops!  Every time I cut a cookie from the dough log, it fell apart, unless I was lucky enough to cut somewhere without a chocolate chip (which happened maybe twice).  Thankfully, the cookies are easily put back togther, and after 12 minutes in the oven, we had delicous, chocolate cookies that if handed out around the world, could go a long way to contributing to world peace as their name suggests.  These are GOOD.

To see how the other BWD bakers enjoyed these, check out the blogroll here.  Up next is the Apple Coconut Family Cake on page 214.

Chocolate Covered Cherry Cookies

Chocolate covered cherries are one of my most favorite candies, especially the ones from a local chocolate store.  When I saw this recpe for chocolate covered cherry cookies, I knew I had to give these a try this year.  Wow, they are amazing!  These are basically made the same way as the classic thumbprint cookies, except these have a chocolate cookie base.  Instead of jam or chocolate, you fill the thumbprint with a maraschino cherry, and top it with a chocolate ganache that is thinned with some of the liquid in the maraschino cherry jar.  These will be added to my cookies I make yearly list as they were that good!

Chocolate Covered Cherry Cookies
Source: From Tasty Kitchen

1-½ cup All-purpose Flour
½ cups Unsweetened Cocoa Powder
¼ teaspoons Salt
¼ teaspoons Baking Soda
¼ teaspoons Baking Powder
½ cups Butter, Room Temperature
1 cup Granulated Sugar
1 whole Egg
1-½ teaspoon Vanilla
1 jar (10 Oz.) Maraschino Cherries, Drained, Reserve Juice
1 package (6 Oz.) Semisweet Chocolate Chips
½ cups Sweetened, Condensed Milk

In a large bowl, combine flour, cocoa powder, salt, baking powder and soda. Blend well and set aside.

In a mixing bowl, beat together butter or margarine and sugar on low speed until fluffy. Add egg and vanilla; beat well.

Gradually add dry ingredients to the creamed mixture; beat until smooth and well blended.

With hands, shape dough into 1-inch balls; place on an ungreased baking sheet. Press down the center of the dough with your thumb.

Drain maraschino cherries well, reserving juice. Place a cherry in the center indention of each cookie.

In small saucepan, combine chocolate pieces and sweetened condensed milk. Heat over low heat until chocolate is melted. Stir in 1 tablespoon plus 1 teaspoon of the reserved cherry juice.

Spoon about 1 teaspoon of the topping over each cherry, spreading to cover the cherry. If frosting seems too thick, thin it with a little more cherry juice.

(I was worried that I read my original recipe wrong when it told me to put the frosting on BEFORE baking. I thought it would melt and run all over. But I did as it said and it is amazing! This super-silky chocolate frosting does not melt or run anywhere! It seals in the cherry beautifully!)

Bake at 350°F for 10 minutes, or until done. Remove to a wire rack to cool.

Makes 3 to 4 dozen cookies.

Enjoy!

Peanut Butter Blossoms

I’m not sure if this is true everywhere, but around here, you won’t find a cookie tray anywhere that doesn’t include these classic Christmas cookies.  In fact, if you want to buy Hershey Kisses,  don’t try and buy them the weekend before Christmas, because you won’t find the plain ones anywhere!  I had to buy 2 of those plastic candy cane things that have the Hershey Kisses in them just so I could make these (and it cost me twice as much!).  I make these every year per the husband’s request, as these are his absolute favorite.  I’m lucky that we have any left at this point!  I love this recipe because the peanut butter cookie is so soft, unlike some others I’ve tried or eaten where the cookie is more crunchy.

Peanut Butter Blossoms
Source: From Hershey’s

48 HERSHEY’S KISSES Brand Milk Chocolates
1/2 cup shortening
3/4 cup creamy peanut butter
1/3 cup granulated sugar
1/3 cup packed light brown sugar
1 egg
2 tablespoons milk
1 teaspoon vanilla extract
1-1/2 cups all-purpose flour
1 teaspoon baking soda
1/2 teaspoon salt
Granulated sugar

Heat oven to 375°F. Remove wrappers from chocolates.

Beat shortening and peanut butter in large bowl until well blended. Add 1/3 cup granulated sugar and brown sugar; beat until fluffy. Add egg, milk and vanilla; beat well. Stir together flour, baking soda and salt; gradually beat into peanut butter mixture.

Shape dough into 1-inch balls. Roll in granulated sugar; place on ungreased cookie sheet.

Bake 8 to 10 minutes or until lightly browned. Immediately press a chocolate into center of each cookie; cookie will crack around edges. Remove from cookie sheet to wire rack. Cool completely. About 4 dozen cookies.

Pumpkin Chocolate Chip Cookies

We had a very rare night out last night and went to a Halloween party hosted by one of the husband’s good friends.  When I asked if I could bring anything, they suggested a dessert.  I wanted to do something a bit different that had the flavors of fall, and that was easy to eat with your hands.  Pumpkin, cookies and chocolate, can you really go wrong there?  The answer – no you cannot.  These cookies were delicious!  They are very soft and cakelike, my favorite cookie combination.  And you don’t need to just take my word for it…there were a ton of desserts at the party, and my cookies were gone within 30 minutes of arriving!  The other desserts were barely touched.  Just saying…

Pumpkin Chocolate Chip Cookies

1 cup canned pumpkin
1 cup white sugar
1/2 cup vegetable oil
1 egg
2 cups all-purpose flour
2 teaspoons baking powder
2 teaspoons ground cinnamon
1/2 teaspoon salt
1 teaspoon baking soda
1 teaspoon milk
1 tablespoon vanilla extract
2 cups semisweet chocolate chips

Combine pumpkin, sugar, vegetable oil, and egg. In a separate bowl, stir together flour, baking powder, ground cinnamon, and salt. Dissolve the baking soda with the milk and stir in. Add flour mixture to pumpkin mixture and mix well.

Add vanilla and chocolate chips.

Drop by spoonful on greased cookie sheet and bake at 350 degrees F (175 degrees C) for approximately 10 minutes or until lightly brown and firm.

Source:  Allrecipes

BWD: Chocolate Chunkers

This week’s Baking with Dorie recipe for Chocolate Chunkers was chosen by Laurie of cookin’ up north.  You can find the recipe for these fabulous cookies on Laurie’s blog (along with some delicious looking pictures), or on pages 70-71 of Dorie Greenspan’s Baking: From My Home to Yours.  Make sure you check out the BWD blogroll to see how the other bakers did with these.

When I saw the picture of these cookies in Dorie’s book, I knew they would be a hit with the husband as he is a certified chocoholic.  These are some seriously chocolate cookies!  The batter has melted bittersweet and unsweetened chocolate and cocoa powder.  Then you mix in semi-sweet and white chocolate chips.  TONS of chocolate!  To add even more chunkiness to these cookies, Dorie adds chopped peanuts (or pecans) and raisins (which I omitted because the husband does not like raisins in cookies).  Once everything was mixed together, you could see very little dough, just the chocolate chips and nuts!

I am happy to report that these cookies did not disappoint.  They came out of the oven about an hour ago, and I think the husband has already demolished three.  They are slightly crispy on the outside, with a nice chewy, brownie-like texture on the inside.  I know they won’t last long around here!  You must try these!!  Thanks Laurie for picking such a great cookie!

Our next BWD recipe for September 27th is for Banana Cream Pie…cannot wait for that one!

BWD: Milk Chocolate Mini Bundt Cakes

I was very excited to pick today’s Baking with Dorie recipe for Milk Chocolate Mini Bundt Cakes.  I am a big fan of chocolate cake, and mini desserts, so this was perfect for me!  Thankfully I was feeling well enough today to tackle this recipe and make a big batch of homemade spaghetti sauce and meatballs.  Quite the productive day for a change!

We had one of my very best friends and her daughter over for dinner tonight to enjoy the spaghetti and the mini bundts.  Dinner of course was comical with a 2-year old and 6-year old chowing down on pasta and cracking each other up.  When it was time for dessert, the kids opted for yogurt, so that left the cakes for us adults!  So while the kiddos chased each other in circles around my house, we sat in the dining room enjoying these divine little cakes.  Rather than make the chocolate glaze for the cakes, I topped mine with a scoop of vanilla ice cream and some strawberries.  YUM!  We all especially loved the nuts that are baked in the middle of the cakes.  These were a hit with the husband, my friend, and even my picky-as-of-late palate.  I would definitely make these again…they are so cute, and so delicious!

Check out the Baking with Dorie blogroll to see how the other fabulous bakers did with these cakes.  Thanks everyone for baking along with me!  You can find this recipe on pages 188-189 of Dorie Greenspan’s Baking: From My Home to Yours, or keep scrolling down.  The recipe for September 13th are the Chocolate Chunkers on pages 70-71.  Can’t wait for those…they look amazing!

Milk Chocolate Mini Bundt Cakes

For the swirl:

3/4 cup chopped walnuts or pecans
2 tsp unsweetened cocoa powder
2 tsp sugar

For the cake:

1 cup all-purpose flour
1/2 tsp baking powder
1/4 tsp salt
1 stick (8 Tbsp) unsalted butter, at room temperature
1/3 cup sugar
1 large egg
1/2 tsp pure vanilla extract
1/2 cup whole milk
7 ounces premium-quality milk chocolate, melted and cooled

For the glaze:

2 ounces bittersweet chocolate, finely chopped
2 tsp light corn syrup
1 Tbsp chopped toasted walnuts or pecans (optional)

Getting Ready:  Center a rack in the oven and preheat the oven to 350 degrees F.  Generously butter a 6-mold mini Bundt pan.

To Make the Swirl:  Toss the nuts, cocoa, and sugar together in a small bowl.

To Make the Cake:  Whisk together the flour, baking powder, and salt.  Working with a stand mixer, preferably fitted with the paddle attachment, or with a hand mixer in a large bowl, beat the butter and sugar together on medium speed until smooth, about 3 minutes, scraping down the bowl as needed.  Add the egg and beat for 1 minute more, then beat in the vanilla.  Don’t be concerned if the mixture looks curdled – it will smooth out soon.  Reduce the mixer speed to low and add half the flour mixture, mixing only until incorporated.  Add the milk, and when it is blended into the batter, add the remaining flour mixture, again mixing just to incorporate.  Finally, add the melted chocolate and mix to blend.

Fill each of the mini Bundt molds with a little batter, then divide the swirl ingredients evenly among the molds and top off the Bundts with the remaining batter.

Bake for 20 to 22 minutes, or until a thin knife inserted into the centers of the cakes comes out clean.  Transfer the pan to a rack and allow the cakes to rest for 5 minutes, then invert them onto the rack and let them cool to room temperature.

To Make the Glaze:  Melt the chocolate in a heatproof bowl over a saucepan of water on or in the microwave oven (which I think is more convenient for such a small quantity of chocolate).  Stir in the corn syrup.  Using a small offset spatula or a table knife, spread the shiny glaze over the tops of the Bundts, then scatter the nuts, if you’re using them, over the glaze.  Let the glaze set at room temperature; it will take about 15 minutes.